Some Common Mistakes When Using a HiCATT High-Speed Image Intensifier

The High-Speed Intensified Camera Attachment (HiCATT) is equipped with an image intensifier, which makes this device VERY SENSITIVE to light and can be permanently damaged by exposure to high levels of light, even unintentionally. This list briefly describes some of the common mistakes that have led to intensifier damage and provides some ideas to avoid them.

Frequent mistake 1: Starting operation of the HiCATT synchronized with multiple instruments (such as lasers, high-speed cameras, etc.).

Uncertainties in timing of multiple instruments can lead to unintentional overexposure of the image intensifier.

Good practice:

 ·       Start by making sure that the camera attached to the HiCATT high-speed imag intensifier is working by itself and that you can see a live image displayed. A properly working camera will make any change in the intensifier settings immediately visible and problems can be addressed in the case of overexposure.

·       Focus the system by imaging a stationary non-reflective object such as a business card using the room lights. Use a low aperture on your lens (high F-number). Continue by setting the same frequency and maximum exposure for the HiCATT and the camera to make sure that there is an overlap between both instruments’ exposures. For example, start by using a 1000 Hz acquisition rate:

HiCATT settings: Use the internal signal generator (software option: under “Synch mode” choose “fixed frequency”). “Frequency”: 1000 Hz. “Gate”: 1 ms.

Camera settings: The exposure time should be set to 1/frame rate. For example, for 1000 Hz, the exposure should be set to 1 ms to make sure that there is overlap with the HiCATT gate.

After successfully imaging a stationary object and knowing that the intensifier and the camera are properly working, you can start synchronizing the system with other instruments or light sources, starting with synchronizing the HiCATT with the camera. Pay attention to the type of trigger signal sent by the “synch” output in the camera (rising edge vs falling edge) and choose the appropriate setting under the HiCATT “Synch mode” setting.


Frequent mistake 2: Unintentional overexposure by direct illumination and unintentional specular reflections.

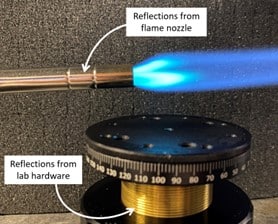
Sources of unintentional overexposure can come from direct illumination from room lights or other light sources in the experimental setup, or specular reflections from objects in the room such as windows, curved pieces of glass in lamps, glassware, or lab hardware.


Good practice:

·       Assess potential sources of overexposure, including light sources and reflective surfaces. Remember that the field of view of the high-speed image intensifier is different from what the user sees, particularly when using wide angle lenses for imaging.

·       Start by imaging at low repetition rates by using the entire sensor of the camera attached to the HiCATT. When using subsections of the camera sensor it is not possible to see potential sources of overexposure that could be going through the intensifier but are unseen by the camera software.

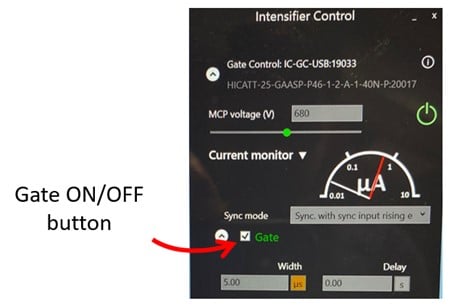
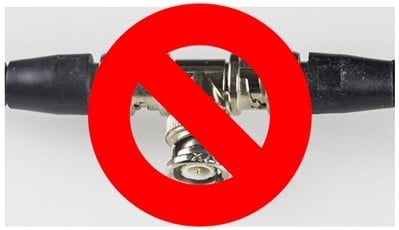
      • Avoid using experimental arrangements that involve direct illumination of the high-speed image intensifier and camera system. If transmission measurements are necessary, make sure to turn off the gate when not collecting data, and to physically protect the HiCATT from any light exposure. Long-term damage can occur due to degradation by continuous exposure to light sources, even those with low intensity (particulary UV sources). Consider using a physical shutter.

Frequent mistake 3: Routinely using a small voltage and high intensity light input.

It may sound like a good idea to start with a low MCP voltage to protect the intensifier, but it may be difficult to identify when the HiCATT is being exposed to large amounts of light that could lead to damage under these conditions.

Good practice:

Using a high MCP voltage in combination with a short gate time will prolong the lifespan of the image intensifier. At higher light levels it is recommended to shorten the gate time as a first option before lowering the MCP voltage. A high voltage will indicate when there is a high amount of light going into the HiCATT.

Frequent mistake 4: Leaving the Gate ON unnecessarily.

When the gate is enabled, the intensifier is very susceptible for damage. Unnecessary use of the intensifier also decreases its lifespan.

Good practice:

When data is not being actively collected, it is recommended to physically block light from entering the system (covering the lens, for example), as well as closing the gate of the image intensifier. The gate is closed by using the HiCATT software as indicated below:

Frequent mistake 5: Using T-connectors, or BNC splitters, to split the signals.

Complex experimental setups that involve multiple instruments may require several signals to make them work in synchrony. Splitting these signals could be used as a strategy to minimize the number of channels needed or to check the relative timing of instruments. However, introducing splitters can result in a distortion of signals that can affect the reliability in triggering. If triggering becomes unreliable, it is difficult to identify the real source of problems in the images captured with the HiCATT.

Good practice:

Do not use BNC splitters, particularly in those locations involving the trigger of the HiCATT and the camera system. Unreliable trigger signals can result in unnecessarily  changing other parameters to try to find an image, even when there may be enough light going into the imaging system.

Frequent mistake 6: Operating the system without adjusting the internal focus.

The distance between the HiCATT and the camera sensor can vary from system to system, due to small differences in the mechanical interface, and the use of adaptors or spacers. This can affect the intensifier’s image focus onto the camera sensor, potentially leading the user to mistakenly adjust other parameters.

Good practice:

 One of the unique features of the HiCATT is its ability to focus the output to perfectly adapt to different cameras and imaging systems. Using a uniform low input illumination (for example, looking at a business card at low light conditions) it is possible to see the fine structure that is usually present in the anode screen of the intensifier (see figure below). If the image from the output appears to be out of focus, it is possible to adjust the focusing position.

If you have any questions about how to safely operate your high-speed image intensifier, feel free to email us: @[email protected]

Or visit our:

Scroll to Top